OpenVIMO video calling
OpenVIMO is a platform for videocalling built as a covfee task. It's main application is recording of online social interaction such as pair conversations or online meetings. Among its features are:
- Different study designs can be specified in Python using a graph structure.
- Crowdsourcing support through covfee.
- Videocalls can be timed.
- Chat with data subjects.
- Admin can view the videocalls without interferring. Please use responsibly by informing data subjects if you intend to use this feature.
- Admin can pause, restart or force stop the videocalls.
Installation
Here we provide instructions for testing OpenVIMO in development mode. To know how to move an OpenVIMO app to production, see below.
First install covfee following the development install instructions.
OpenVIMO is built on top of OpenVIDU, an open-source WebRTC framework with an on-premise server that integrates an API for handling calls, a STUN/TURN server and recording capabilities. The OpenVIDU server should be ran separately. To do it, follow OpenVIDU deployment instructions.
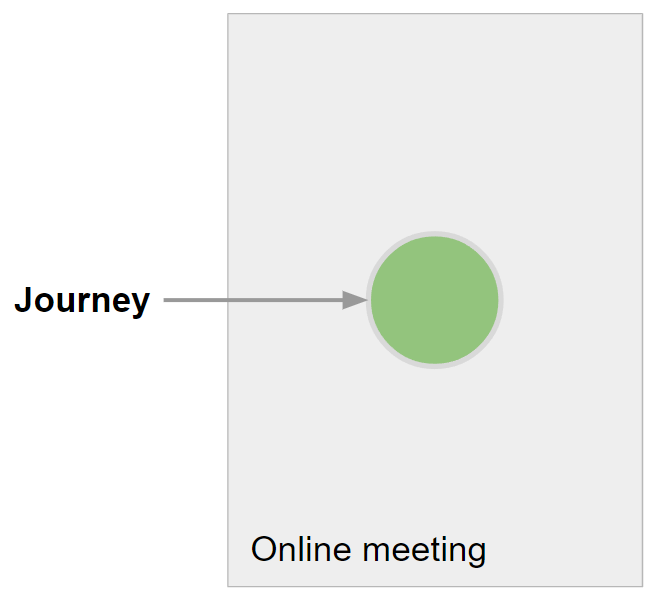
Sample 1: meeting room
Here we create a simple covfee app for meeting rooms with shareable URLs. This can function as a flexible deployment for holding (regular) meetings in covfee and recording them into a dataset.
In covfee experiments (HITs) are always specified by a list of nodes or tasks, and a list of journeys or paths through those nodes. Each of these journeys maps to a URL, and normally to one participant. However, because in this case we want to allow an arbitrary number of participants to join the videocall using the same URL, we will create a single journey. The graph structure of this deployment is therefore very simple:
First we will create a folder for the covfee project. This folder may be anywhere in the file system. Then we will create the following structure:
my_folder
    - meeting.py
The naming is not relevant. Paste the following into the meeting.py:
from covfee import HIT, Project, tasks
from covfee.config import config
from covfee.shared.dataclass import CovfeeApp

config.load_environment("local")

spec_meeting = {
    "name": "Videocall",
    "serverRecording": {
        "hasAudio": True,
        "hasVideo": True,
        "outputMode": "INDIVIDUAL",
    },
}

t1 = tasks.VideocallTaskSpec(**spec_meeting)
hit = HIT("Videocalling")
hit.add_journey(nodes=[t1])

projects = [Project("My Project", email="example@example.com", hits=[hit])]
app = CovfeeApp(projects)
Here we import the necessary classes, create a VideocallTaskSpecs object holding the specification of our videocalling task, and assign it to a journey, a HIT and a project (more information). Finally, we create the app object. Covfee internally looks for this object by name (important that it is called app) and uses it as starting point to read the specification.
- The full list of options for the VideocallTaskSpec is provided below.
That is all! We are now ready to start Covfee. To run it in development mode:
covfee make meeting.py --force --dev
This will parse the specification, create the database, and start the covfee server.
And make sure to start webpack on another tab (more info):
covfee webpack
After this the Covfee admin panel should be accessible in the URL displayed when running the Covfee server (http://localhost:5000/admin# by default).
For more information about running Covfee in development mode see here.
Sample 2: dyadic conversations
This sample creates a more complex HIT structure. Here we want two subjects to fill in individual consent forms, then have a videocall together, and then fill in post-experiment surveys. The graph structure for this interaction is:
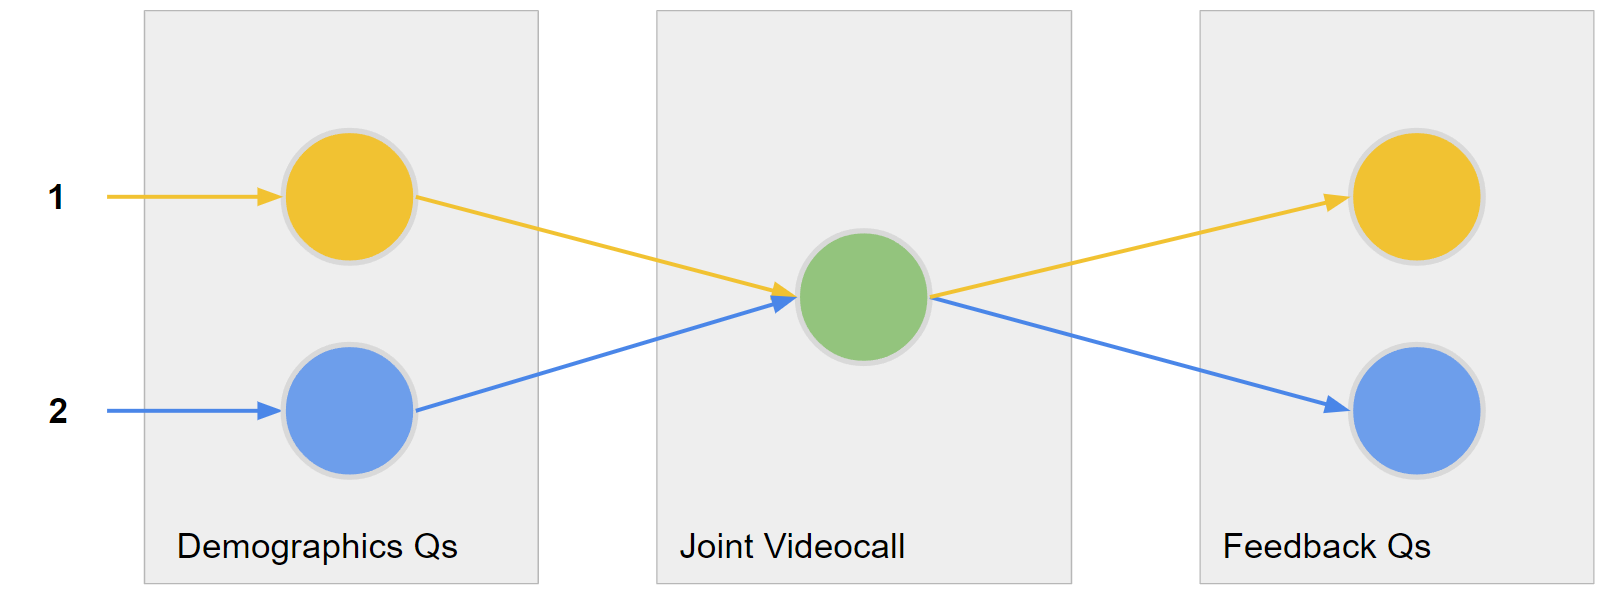
We can code this structure with the following code:
# from covfee import Task, HIT
from covfee import HIT, Project, tasks
from covfee.config import config
from covfee.shared.dataclass import CovfeeApp

config.load_environment("local")

spec_consent_form = {
    "name": "Consent",
    "content": {"type": "link", "url": "$$www$$/consent.md"},
    "form": {
        "fields": [
            {
                "name": "name",
                "label": "Full name:",
                "required": True,
                "input": {"inputType": "Input"},
            },
            {
                "name": "consent",
                "label": "To proceed, you must expressly provide consent per the terms above.",
                "required": True,
                "input": {
                    "inputType": "Checkbox.Group",
                    "options": [
                        {
                            "label": "I consent to the sharing of my personal data.",
                            "value": "yes",
                        }
                    ],
                },
            },
        ]
    },
}

spec_instructions = {
    "name": "Instructions",
    "prerequisite": True,
    "content": {"type": "link", "url": "$$www$$/instructions.md"},
    "form": {
        "fields": [
            {
                "name": "agreement",
                "label": "To proceed, you must expressly agree to the provided instructions.",
                "required": True,
                "input": {
                    "inputType": "Checkbox.Group",
                    "options": [
                        {
                            "label": "I agree with the provided instructions.",
                            "value": "yes",
                        }
                    ],
                },
            }
        ]
    },
}

spec_videocall = {
    "name": "Videocall",
}

spec_final_survey = {
    "name": "Final Survey",
    "form": {
        "fields": [
            {
                "name": "enjoyment",
                "label": "Did you enjoy your interaction?",
                "required": True,
                "input": {
                    "inputType": "Radio.Group",
                    "options": ["Yes", "No"],
                },
            }
        ]
    },
}
j1_consent = tasks.InstructionsTaskSpec(**spec_consent_form)
j1_instructions = tasks.InstructionsTaskSpec(**spec_instructions)
j1_final = tasks.QuestionnaireTaskSpec(**spec_final_survey)

j2_consent = tasks.InstructionsTaskSpec(**spec_consent_form)
j2_instructions = tasks.InstructionsTaskSpec(**spec_instructions)
j2_final = tasks.QuestionnaireTaskSpec(**spec_final_survey)

videocall_task = tasks.VideocallTaskSpec(**spec_videocall)


hit = HIT("Dyadic videocall")
j1 = hit.add_journey(nodes=[j1_consent, j1_instructions, videocall_task, j1_final])
j1 = hit.add_journey(nodes=[j2_consent, j2_instructions, videocall_task, j2_final])

projects = [Project("My Project", email="example@example.com", hits=[hit])]
app = CovfeeApp(projects)
Moving to production
-
Make sure that OpenVIDU is installed in your server in production mode. Recording requires a server with significant resources and open ports.
-
Move your covfee app to production by following Covfee's deployment instructions.
Configuration options
The full list of configuration options for the videocalling task:
allowMute
Type: boolean
Default:
Description: Allow the user to mute their own audio
allowScreenShare
Type: boolean
Default:
Description: Allow the user to share their screen
allowStopVideo
Type: boolean
Default:
Description: Allow the user to stop their own video
countdown
Type: number
Default: 0
Description: Seconds countdown after start condition met.
instructions
Type: string
Description: Instructions to be displayed for the node
instructions_type
Type: string
Default: 'default'
Description: How the instructions will be displayed
layout
Type: string
Default: 'grid
Description: Layout mode
max_submissions
Type: number
Default: 0
Description: Maximum number of submissions a user can make for the task.
muted
Type: boolean
Default:
Description: Videocall is muted
n_pause
Type: number
Description: If the number of subjects is n_pause or less, the task will be paused
n_start
Type: number
Description: Number of jorneys required to start task
name
Type: string
prerequisite
Type: boolean
Default: False
Description: Node is marked as a prerrequisite Prerrequisite nodes must be completed before the rests of the nodes in the HIT are revealed.
required
Type: boolean
Default: True
Description: If true, this node must have a valid submission before the HIT can be submitted
serverRecording
Type: object
Description: Recording options for OpenVIDU
enable
Type: boolean
Description: Enable server recording
frameRate
Type: number
Default: 25
Description: Only applies for COMPOSED output mode
hasAudio
Type: boolean
Description: Record audio
hasVideo
Type: boolean
Description: Record video
outputMode
Type: string
Description: record all streams in a single file in a grid layout or record each stream in its own separate file.
resolution
Type: string
Default: 1280x720
Description: Video resolution. Only applies for COMPOSED output mode
timer
Type: number
Description: Time to complete the task
timer_empty
Type: number
Description: Empty timer is started everytime the task is empty (no journeys online) If the timer reaches zero, the task is set to finished state.
timer_pausable
Type: boolean
Description: If true, the timer will pause when the task is paused.
timer_pause
Type: number
Description: Pause timer is started every time the task enters paused state If timer reaches zero, the task is set to finished state.
type
Type: string
Default: VideocallTask
useSharedState
Type: boolean
Description: If true, the task state will be synced between clients. This applies both to multiple clients in the same journey and across journeys. Internally covfee uses socketio to synchronize task state.
videoOff
Type: boolean
Default:
Description: Call is audio only video is always off
wait_for_ready
Type: boolean
Description: If true, all journeys must click ready to start the task