Getting Started
This guide takes you through the process of creating a simple covfee interface which gathers continuous data from subjects.
Covfee makes use of Dict[str, Any] as input format. In this guide we assume that you are familiar with the JSON syntax.
1. Install covfee
Follow the installation instructions if you have not done so already.
2. Specify your HITs
In this example project, we will assume that we have three annotators that will be performing the same HIT (separately). The HIT consists in four tasks: 1) filling a questionnaire where we ask for demographic information, 2) reading the instructions for affect annotation, 3) annotating affect in a video and 4) filling a questionnaire where we ask them for feedback on their experience during the annotation process.
This can be set up by creating a covfee project containing the HIT as follows:
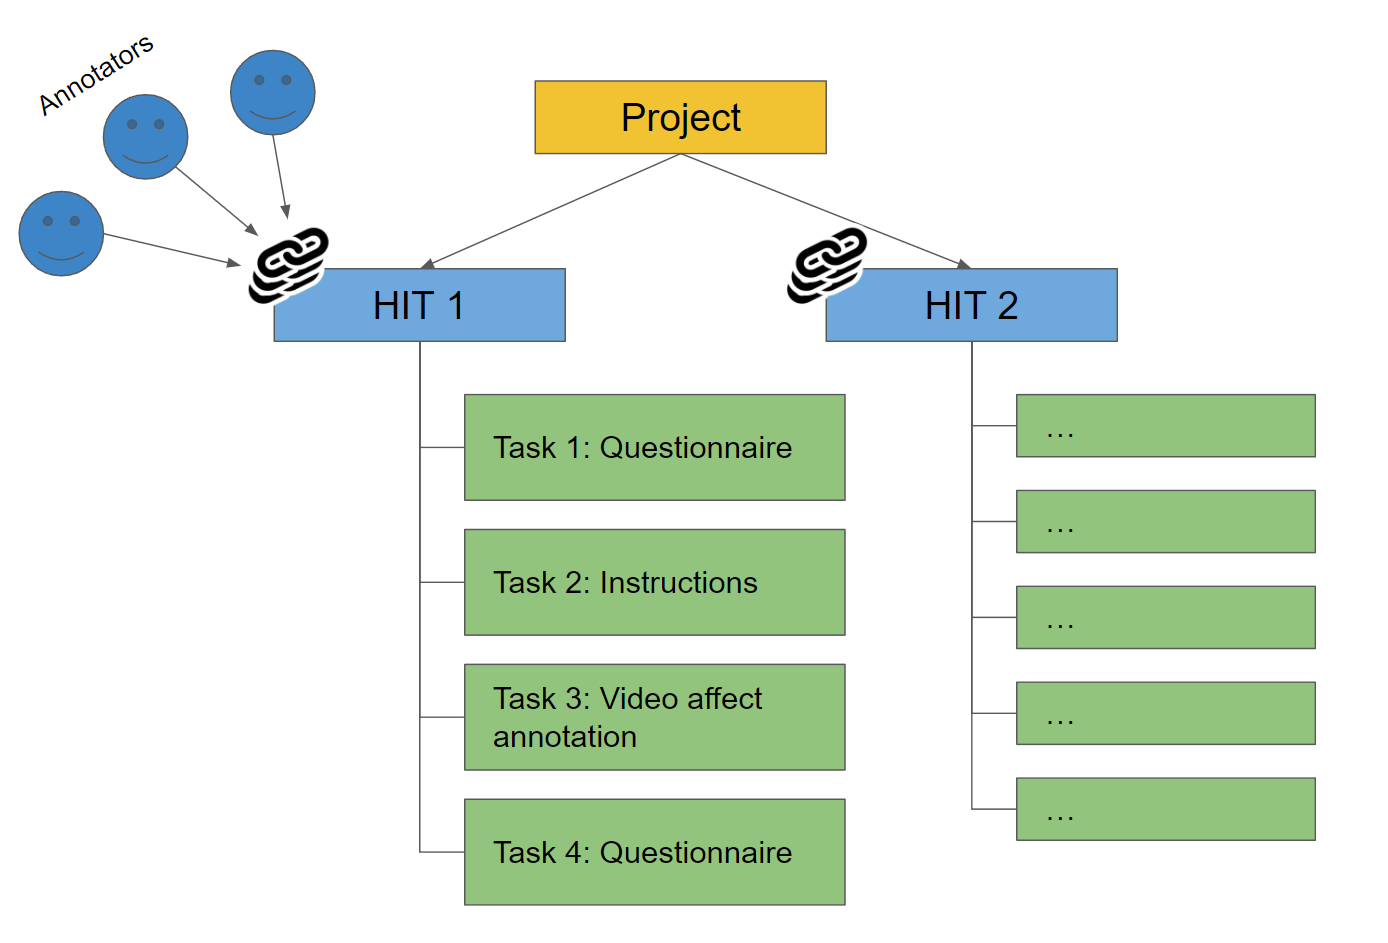
Covfee will produce multiple URLs per HIT, which can be sent to the three annotators. Covfee projects may contain multiple HITs (like HIT2 in the picture) but this project only requires a single HIT. Covfee tasks can also be very diverse, and you can even implement your own if you know Javascript. You can see live examples of the tasks available in covfee in the Playground section.
You make use of covfee by first creating a JSON file specifying your HITs. First create a folder for your covfee project and a file example.covfee.json with the following content:
{
  "id": "getting_started",
  "name": "My Covfee Project",
  "email": "example@example.com",
  "hits": [
    {
      "id": "hit1",
      "name": "HIT1",
      "tasks": [
        ...
      ],
      "interface": {
        "type": "timeline"
      }
    }
  ]
}
This is the skeleton of a covfee project and example.covfee.json will contain the full specification of it. It starts with the name and email of the contact person in charge of the study, which will be available to participants. The hits section contains an object per HIT, in this case a single one. We will specify our tasks next.
Task 1. Questionnaire
We will start by specifying the form / questionnaire that we want annotators to fill in in Task 1. We will ask them for their age (number input), sex (select input) and nationality (free text input):
{
  "name": "Demographics",
  "type": "QuestionnaireTask",
  "form": {
    "fields": [
      {
        "name": "age",
        "label": "Your age:",
        "input": {
          "inputType": "InputNumber"
        }
      },
      {
        "name": "sex",
        "label": "Your sex:",
        "input": {
          "inputType": "Select",
          "options": [
            {"label": "Male", "value": "m"},
            {"label": "Female", "value": "f"}
          ]
        }
      },
      {
        "name": "nationality",
        "label": "Your nationality:",
        "input": {
          "inputType": "Input"
        }
      }
    ]
  }
}
Go ahead and paste the text above into the tasks section of the project specification.
Task 2. Instructions
Next we will specify the instructions task. Covfee's InstructionTask supports linking to a Markdown file with instructions. A Markdown file may contain rich text, images, audio and even videos. We will make use of it for our instructions:
{
  "name": "Instructions",
  "type": "InstructionsTask",
  "content": {
    "type": "link",
    "url": "$$www$$/instructions.md"
  }
}
Now we only need to create our instructions.md file with the following content:
# Instructions

You will be shown a video of a person. Please rate their arousal using your keyboard up/down arrows.
An important matter is where to place this file. Covfee is able to read local files placed in a specific location: a folder named www located directly under your covfee project folder. Go ahead and create this folder and place your instructions.md file inside. After, this your file structure should look like:
myproject
    example.covfee.json
    www
        instructions.md
The $$www$$ special variable above is used to point to the special www folder. Note that this is the only way to work with local files unless you set up a file server yourself.
Task 3. Annotation
Next, we will add the continuous task in which subjects must annotate a one dimensional variable: the arousal of the subject, in a video of a person reading:
{
  "name": "Arousal annotation",
  "type": "Continuous1DTask",
  "media": {
    "type": "video",
    "url": "$$www$$/person_reading.mp4"
  },
  "intensityInput": {
    "mode": "ranktrace"
  }
}
Here again we want to provide a local video to covfee by placing it in the www folder. You can download this video to use as a sample.
Alternatively, you can provide the URL of a publicly hosted video like:
      ...
      "url": "https://cdn.jsdelivr.net/gh/josedvq/covfee@master/samples/keypoints/www/person_reading.mp4"
      ...
Task 4. Questionnaire
Finally, we will ask annotators to give their feedback about the annotation process, to know if we can improve something.
{
  "name": "Feedback",
  "type": "QuestionnaireTask",
  "form": {
    "fields": [
        {
            "name": "rating",
            "label": "How would you rate your experience in completing this experiment?",
            "required": true,
            "input": {
                "inputType": "Rate",
                "half": true
            }
        },{
            "name": "feedback",
            "label": "Do you have any comments that can help us improve the experience?",
            "input": {
                "inputType": "Input.TextArea"
            }
        }
    ]
  }
}
By now your covfee specification (example.covfee.json file) should contain four tasks whithin its tasks section and look exactly like this file. Your project folder should look like this:
myproject
    example.covfee.json
    www
        instructions.md
        myvideo.mp4
2. Run covfee
Covfee uses the previous JSON specification to create a database that will store the responses to the tasks.
All you need to do now is to run covfee make . from the project folder:
cd myproject
covfee make .
covfee make . will read all the .covfee.json files in the folder, initialize a database for covfee, run covfee, and launch a browser window where you can access the admin panel. You should now see your web browser open and take you to covfee's admin panel.
3. Annotate!
You can get URLs for your HITs from covfee's admin panel, as well as download completed annotations.
More
For more samples, please check the samples folder in Github