Developing custom tasks
New custom tasks or HIT types can be added by implementing a React component meeting a few conditions. For some tasks, a Python base class must be sub-classed too. To be valid, task components must meet these conditions:
Types of tasks
There are two main types of tasks in covfee:
- Tasks with shared state, or multiplayer tasks are meant to be visited by multiple users at the same time. A chess game, or a collaborative live view form to be filled by multiple users at the same time is an example of a shared state task. Covfee internally manages state synchronization and persistence. A copy of the latest state is kept in the server. If the task is opened in multiple clients (windows/tabs), they will all be kept in sync and changes can be observed live.
- Tasks without shared state, or "single player" tasks are meant to be visited by a single user. A standard form is a good example. If these tasks are opened in multiple clients (windows/tabs) they will not be kept in sync. Their state will diverge when multiple users make changes.
Task state
Covfee tasks are, in their most basic form, simply React components. In other words, copy-pasting any React component as a Covfee task would "work". However, in any type of online experiment we normally want to store the results of the task (eg. the answers to a questionnaire).
In covfee, task components do not explicitly store or commit these results to the server. Instead, the state of the task is stored automatically by Covfee. To make use of this, any task state that should be persisted by Covfee must be managed in a central Redux store. In other words, implementing Covfee tasks boils down to implementing React components with a Redux state store in all cases. This means following the Redux design phylosophy by defining actions and reducers, which produce a new state given an action and the current state:
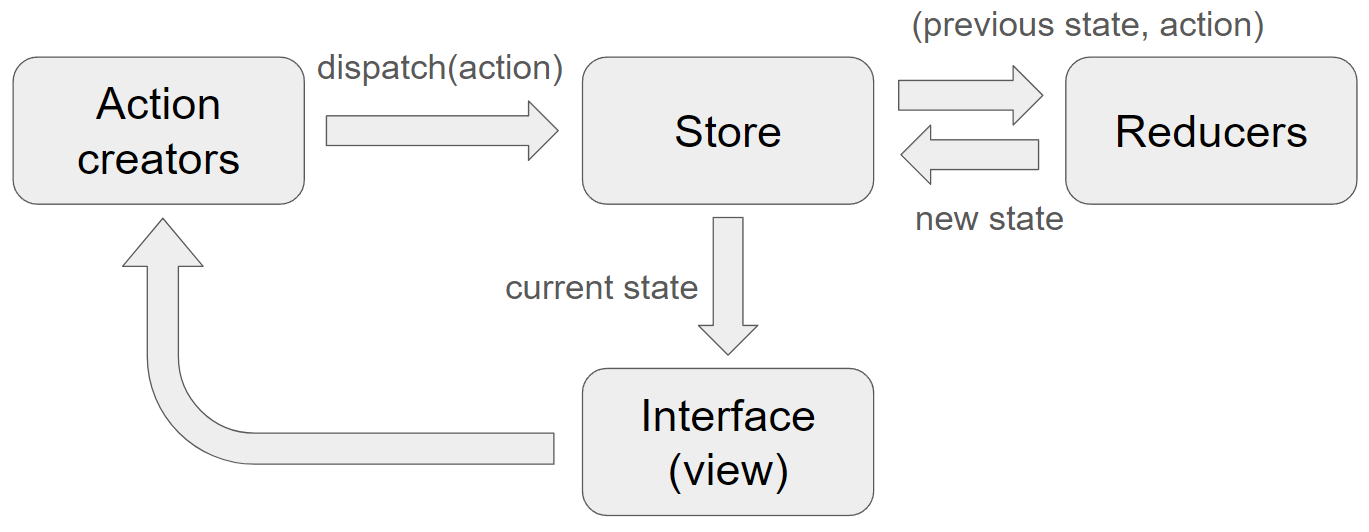
The React component's (Interface / view) job is simply to update the DOM according to the current state, and to dispatch actions in response to browser events.
State persistance and loading is managed internally by Covfee:
-
For shared state tasks, Covfee will keep the most up-to-date state in the server, which will always represent the latest state of the task.
-
For non-shared state tasks, the latest state is kept in the browser and persisted when necessary. Covfee submits and persists state whenever:
- When a certain time has passed after the last state change. The default is 3s.
- The user moves to the next or previous task or otherwise leaves the task. An exception is if the user abruptly closes the browser window/tab where the task is open. In this case the state may not sent to the server.
- The user presses the "submit" button in the task.
State that does not need to be stored can be managed separately, for example using React's useState.
Tutorial: developing your own task
Background
This tutorial requires a basic understanding of Typescript, HTML, React and Redux. For progressing to more complex custom tasks the following is recommended:
- Typescript, Javascript, HTML, CSS. For more complex tasks, a good level of CSS might be necessary.
- React: functional components, hooks (useState, useEffect, useContext, useRef, useMemo), custom hooks, fetching data. It's important to understand the nuances behind hooks and dependencies: when do hooks run?
- Redux, Redux toolkit. Important to understand how to think about application state and how to design the state, actions and reducers:
In general, you should know how to design and write a React application using Redux for state management.
Installation
Please start by following the development install instructions to install Covfee.
The tutorial
In this tutorial, we will create a simple contact form asking users for their name and email. Additionally, the task will have one boolean prop (showPhoneField) that, if true, will add a phone number field to the form. The answers to the form will be preserved in task state.
We will place Typescript files for the task in covfee/client/tasks, in the following structure:
covfee
    client
        tasks
            - my_task
                - index.tsx       # the main React component
                - slice.ts        # the state specification
                - spec.ts         # the props for the task
                ...               # any extra files needed
Task props
First, we place the specification for the task props in the spec.ts file:
import { BaseTaskSpec } from "@covfee-shared/spec/task"

/**
 * @TJS-additionalProperties false
 */
export interface TutorialTaskSpec extends BaseTaskSpec {
  /**
   * @default "TutorialTask"
   */
  type: "TutorialTask"
  /**
   * Media file to be displayed.
   */
  showPhoneField?: boolean
}
These props will be parsed by Covfee so that they can be provided in Python when the task is created. They allow the user to configure the way a task is rendered to the user. In this case, we only provide two props. One is the name of the task. This will be the name of the task's Python class and is a constant value. The other one is our only true prop showPhoneField, which we define to be boolean. The comments provided here will be parsed and will be available in Python when creating task objects. The line TJS-additionalProperties false specifies that no additional properties should be allowed when the task is validated.
State
Tasks in covfee specify their state by creating a Redux Toolkit slice. For our purposes a slice is just an object that encapsulates the initial state and the reducers for the task. In this case, we need the state to hold the user's name, email and phone number. Our slice.ts file looks like this:
import { createSlice } from "@reduxjs/toolkit"

export interface State {
  name: string
  email: string
  phone: string
}

export const initialState: State = {
  name: "",
  email: "",
  phone: "",
}

export const slice = createSlice({
  name: "form",
  initialState,
  reducers: {
    setName: (state, action) => {
      state.name = action.payload
    },
    setEmail: (state, action) => {
      state.email = action.payload
    },
    setPhone: (state, action) => {
      state.phone = action.payload
    },
  },
})

export const { actions, reducer } = slice
Here we specified the type for the state, the initial state, and wrote separate reducers to set name, email and phone number.
React Component
Following React + Redux design philosophy, the main job of the React component is to sync state with the DOM (view), by reading the state and by calling Redux actions in response to user events. In this case we read the state variables using useSelector in the same way it is used in Redux, and we call Redux actions whenever the content of the input elements changes. That's all!
import React from "react"
import { slice, actions, State } from "./slice"
import { TaskExport } from "../../types/node"
import { CovfeeTaskProps } from "../base"
import type { TutorialTaskSpec } from "./spec"
import { AllPropsRequired } from "../../types/utils"
import { useDispatch } from "../../journey/state"
import { useSelector } from "react-redux"

interface Props extends CovfeeTaskProps<TutorialTaskSpec> {}

const TutorialTask: React.FC<Props> = (props) => {
  // here we set the defaults for the task props
  // we could use useMemo to avoid recomputing on every render
  const args: AllPropsRequired<Props> = {
    ...props,
    spec: {
      showPhoneField: true,
      ...props.spec,
    },
  }

  // we read the state using useSelector
  const name = useSelector<State, string>((state) => state.name)
  const email = useSelector<State, string>((state) => state.email)
  const phoneNumber = useSelector<State, string>((state) => state.phone)

  // this is a custom dispatch function provided by Covfee
  const dispatch = useDispatch()

  // and we render the component
  return (
    <form>
      <div>
        <label htmlFor="name">Name:</label>
        <input
          type="text"
          id="name"
          value={name}
          onChange={(e) => dispatch(actions.setName(e.target.value))}
          required
        />
      </div>
      <div>
        <label htmlFor="email">Email:</label>
        <input
          type="email"
          id="email"
          value={email}
          onChange={(e) => dispatch(actions.setEmail(e.target.value))}
          required
        />
      </div>
      {args.spec.showPhoneField && (
        <div>
          <label htmlFor="phone">Phone:</label>
          <input
            type="tel"
            id="phone"
            value={phoneNumber}
            onChange={(e) => dispatch(actions.setPhone(e.target.value))}
          />
        </div>
      )}
    </form>
  )
}

export default {
  taskComponent: TutorialTask,
  taskSlice: slice,
  useSharedState: false,
} as TaskExport
Note the export statement at the end of the file. Covfee expects every task to export a default object with these keys. useSharedState should only be set to true for multiplayer tasks.
Importing the task
Now that the task is created, the task should be imported into Covfee source files. To do this, modify the file at /covfee/client/tasks/index.ts to import your custom task. Simply follow the same pattern as for the rest of the imports in the file. The task props specification (spec) should also be imported in /covfee/shared/spec/task.ts.
Now we are ready to create the auto-generated code that Covfee is designed to create. Covfee auto-generates two files using the tasks' props specification:
- /covfee/shared/schemata.json - JSON schemata. Each task props specification (spec) is translated into a JSON schema, used for validation and for generating the dataclasses.
- /covfee/shared/task_dataclasses.py contains the dataclasses that can be used to create task objects in Python. These are simple objects that take the task props as constructor arguments. Covfee internally translates them into database entries to initialize its database on startup.
These files may be useful for debugging purposes to eg. make sure that the dataclasses have the right arguments, types and comments.
To (re-)create both of these auto-generated files run:
covfee-dev schemata
After this step, it should be possible to manually verify that the dataclasses file contains a new class for our custom task.
Running the task
The task is ready to be used. To do this in a dev environment, create a folder for the covfee project. This folder may be anywhere in the file system. The we will create the following structure:
my_folder
    - tutorial.py
The naming is not relevant. Paste the following into the tutorial.py:
from covfee import tasks, HIT, Project
from covfee.config import config
from covfee.shared.dataclass import CovfeeApp

config.load_environment("local")

my_task_1 = tasks.TutorialTaskSpec(name="My Task 1", showPhoneField=True)
my_task_2 = tasks.TutorialTaskSpec(name="My Task 2", showPhoneField=False)

hit = HIT("Joint counter")
j1 = hit.add_journey(nodes=[my_task_1, my_task_2])

projects = [Project("My Project", email="example@example.com", hits=[hit])]
app = CovfeeApp(projects)   # we must always create an app object of class CovfeeApp
Here we import the necessary classes, create two task objects using the same (auto-generated) TutorialTaskSpec class, and link them together in a journey. We create a HIT with a single journey, and a project with a single HIT. Finally, we create the app object. Covfee internally looks for this object by name (important that it is called app) and uses it as starting point to read the specification.
We can now start covfee with:
covfee make tutorial.py --force --dev
This will parse the specification, create the database, and start the covfee server.
In development mode, we need to run the webpack server separately. To do it, in another terminal run:
covfee webpack
After this the Covfee admin panel should be accessible in the URL displayed when running the Covfee server (http://localhost:5000/admin# by default). The links to the Journey (with the two tasks) should be available in the admin panel (under Journeys).
With this development setup, any changes to the client or server will be hot-reloaded. Therefore it should be possible and convenient to edit the task's React component or the backend while running the app.